Picture
_
It often times becomes necessary to have more computer monitor space.  One way to increase your amount of screen space is to buy an inexpensive second monitor or make use of an old monitor and connect it to your computer (if you're using Windows 7, Windows Vista, or Windows XP)—allowing for more free screen space in which you can work.


Dual Monitor Setup Checklist
  • Two or more monitors (one, if you’re setting up a laptop), which may be of any combination including the following: flat-panel LCD monitors, CRT monitors, one of each, or even a TV screen as a monitor.  If you are going to buy a monitor consider the following:
    • Picture quality
    • Screen size
    • Screen resolution
    • Compatibility with your computer port
    • Higher contrast ratio
    • Color richness
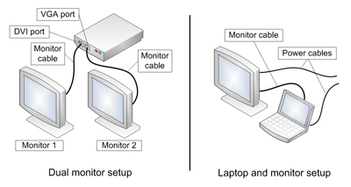
  • Two monitor cables that match the connection types of your computer to connect the monitors to the computer (one for a laptop).
  • A monitor connection on your computer for each monitor you want to connect such as the following:
    • Digital Visual Interface (DVI) connectors
    • Video Graphics Array (VGA) connectors
    • HDMI (High Definition Multimedia Interface) connectors
    • S-Video connectors for using your TV as a monitor

_
Connecting of Monitor Cables

Make sure the monitor is plugged in and turned on. Your computer should automatically detect the second monitor.  If you’re using Windows XP, you’ll need to enable Dualview.
When your computer detects the monitor, it should also automatically detect and apply the display settings appropriate for the monitor.

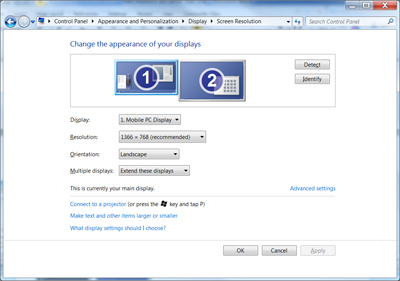
Configure your displays

If necessary, you can drag the monitor icons so that they are arranged in the same way as the monitors on your desk. Click Identify to verify which monitor is 1 and which monitor is 2. You’ll see the numbers appear on your monitors.

Under Multiple displays, you can also adjust what you see on the second monitor. You have the following choices:

  • Extend your displays. This spreads your desktop over both monitors and lets you drag items between the two screens.  After your monitor is set up, you can use your mouse to grab the title bar (the top portion) of a window and drag it to your new display.
     
  • Duplicate your displays. This displays the same desktop on both monitors. For a laptop, this is the default setting. This is useful if you're giving a presentation with your laptop connected to a projector or large monitor.
     
  • Show your desktop on only one monitor. This is most commonly used with a laptop if you want to keep your laptop screen blank after you connect to a large desktop monitor.
When you disconnect the additional monitor the following occurs:

  • Original display settings are restored to your primary display
  • All open files and program windows are moved to the primary display
The next time that you connect the same monitor, the Windows operating system automatically applies the display settings that you used the last time that you connected this monitor.

Want more tips like these? Subscribe, it's free!
 
 
Windows 7 comes with some very attractive new wallpapers, and it's not always easy to decide which one you like the best. So why not choose a few, and let Windows display them all in a desktop slideshow?

Right-click an empty part of the desktop, select Personalize > Desktop Background, then hold down Ctrl as you click on the images you like. Choose how often you'd like the images to be changed (anything from daily to once every 10 seconds), select Shuffle if you'd like the backgrounds to appear in a random order, then click Save Changes and enjoy the show.
Slideshow
DESKTOP SLIDESHOW: Select multiple background images and Windows will cycle through them
 
 
Windows 7 has some spectacular new themes - there's a great selection at the Microsoft site - but installing them can have one annoying side-effect. If you've previously changed a system icon like Computer or the Recycle Bin then that could disappear, replaced by the equivalent icon from the theme pack.

To prevent this, right-click an empty part of the desktop, select Personalize > Change Desktop Icons, clear the "Allow themes to change desktop icons" box and click OK. Your icons will now be preserved, and the only way to change them will be manually, from the same Desktop Icons dialogue.
Desktop Icons
 
 
If an application locks up under a previous version of Windows then there was nothing you could do about it. A new Windows 7 option, however, can not only explain the problem, but may get your program working again without any loss of data.

When the lockup occurs, click Start, type RESMON and click the RESMON.EXE link to launch the Resource Monitor.

Find your frozen process in the CPU pane (it should be highlighted in red), right-click it and select Analyze Wait Chain.

If you see at least two processes in the list, then the lowest, at the end of the tree, is the one holding up your program. If it's not a vital Windows component, or anything else critical, then save any work in other open applications, check the box next to this process, click End Process, and your locked-up program will often spring back to life.

Picture
 
 
At first glance the Windows 7 calculator looks just like Vista's version, but explore the Mode menu and you'll see powerful new Statistics and Programmer views. And if you're clueless about bitwise manipulation, then try the Options menu instead. This offers many different unit conversions (length, weight, volume and more), date calculations (how many days between two dates?), and spreadsheet-type templates to help you calculate vehicle mileage, mortgage rates and more.
Picture
Don't take any Windows 7 applet at face value, then - there are some very powerful new features hidden in the background. Be sure to explore every option in all Windows applets to ensure you don't miss anything important.


Tip: Stepping away from your computer and don't want anyone seeing or accessing your computer account? More than one user using the same computer and hate to log off so the other person can use it?  You can lock your computer if you need to go do something else but don’t want to shut everything down, like when you log out.  

For that, press the "Windows Key(start) + L" to lock it.

Lock Picture
Then either use the "Switch User" feature to allow other users to use the computer or just log back in and everything will be the same way you left it.

No need to log off or close browsers or email clients.
 
 
Picture
"How to Recover a Deleted File in Windows 7"

Windows 7 has a built-in tool called Previous Version that allows users to recover files they mistakenly delete. In order to recover deleted files you have to first make sure that System Restore is enabled so that Windows can automatically create restore points. These restore points are what you can revert a folder to in order to recover the files that existed at that time and date.

Step 1 - Making Sure System Restore Is Enabled

You can verify that System Restore is turned on by right-clicking Computer and selecting Properties. Next, you'll want to click the System Protection tab and then click the drive you wish to turn on System Restore. The C: drive is usually the drive selected. After selecting the desired drive and clicking OK, System Restore will be turned on if it was previously off.

Step 2 - Recovering a Changed Document in Windows 7

  1. Open the folder where the file was located.
  2. Right-click in the white space within that folder.
  3. Select Properties and click OK.
  4. The Properties screen will then pop-up. In this screen, select the Previous Versions tab.
  5. The Previous Versions tab will then display various versions of changed or deleted files in that folder. These versions are based on automatic restore points created by System Restore.
  6. Choose the version time and date you wish to revert back to.
  7. Then click Open.
  8. You will then see all of the previous versions of files in that folder according to the time and date you selected.
  9. To recover one of those files, rick-click the file and select Send to and then choose the folder you wish to save the file to.
That's it! Now you know how to recover lost files. It's a handy, useful tool that Microsoft built into Windows 7. We recommend you take full advantage of the Previous Versions tool as it will save you headaches down the road.